„Constructions“ Mode
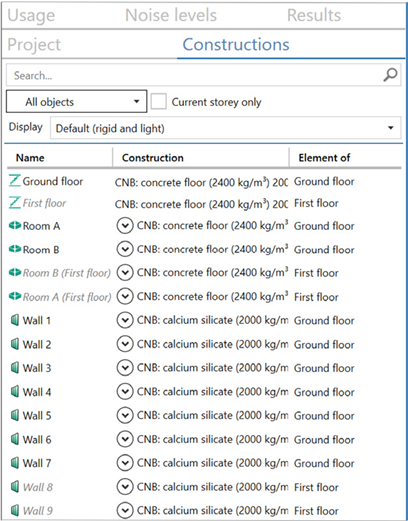
With the "Constructions" mode selected, constructions can be selected or selected constructions can be changed. Double-click on a table row (basic constructions or additional layers) to open the Construction browser (see Construction Browser). Alternatively, you can double-click on a component in the 2D view.
Object list
The objects "Storey", "Room", "Wall" and - if available - "Inserted/small element" are listed in the list box. There is a filter option in the upper area above the list box, with "All objects" set by default. The following rules apply to the assignment of constructions:
- The storey defines the main construction of the ceiling for the whole storey including all rooms contained in it.
- The room defines the main construction of the floor for this room and, if applicable, additional layers such as screed or suspended ceiling as well as flanking transmissions that are specified as Dnf for the floor or ceiling, if required.
- The definition of the main construction of the floor for a room overwrites the definition of the main construction of the ceiling for the floor below (only for the area of the room).
- Screed/suspended ceiling cannot be defined for the entire floor, but only for each individual room.
Note
For constructions assigned to the flooring where only an improvement for airborne sound transmission \(\Delta R\) or impact sound transmission \(\Delta L\) is entered, the column/field without an entry is set to zero in the calculation.
Note
Using multi-select (see Multi-Select), constructions can be copied and pasted quickly and easily.
Using the symbol  available for each line, additional layers can be assigned to a main construction. (lining \(L\)/lining \(R\): left/right corresponds to the direction, seen from the first to the last point of the wall.
Option "Display"
Default (rigid and light)
By default, all (rigid and light) basic constructions and additional layers and their assignment to one of the groups “storey / room / wall” of the building are displayed. Components that are not on the active floor are displayed in a lighter shade of gray.
diverging flanks (\(D_{n,f}\)/\(L_{n,f}\))
In rooms, it is possible to enter a \(D_{n,f}\) for both floors and ceilings. For walls there is the possibility to enter a horizontal and a vertical \(D_{n,f}\). For more information about the implementation of \(D_{n,f}\)/\(L_{n,f}\) in CadnaB see Room and Wall.
diverging façades
only shows diverging façade constructions in the project (see chapter Wall)
Context menu
The following commands are available in the "Constructions" mode:
- Assign main construction: opens the construction browser (see Construction Browser) to select the basic construction
- Switch additional layer left/right: does exactly that for additional layers at walls (see Wall)
- Expand sub-constructions: expands the display in the "Constructions" list by the selection for additional layers/façade/Dn,f for the current wall/ceiling/floor
- Collapse constructions: reduces the display in the "Constructions" list for the current wall/ceiling/floor:
- Copy constructions: copies the construction data of the current element (including the selected additional layers left/right and, if applicable, the selections for options "Façade" and "Dn,f")
- Paste constructions: inserts the copied construction data into the selected element (including the selected additional layers left/right and, if applicable, the selections for the options "Façade" and "Dn,f")
- Remove all constructions: deletes the construction data (including the selected basic construction) for the currently selected element
- Remove only additional layers: only deletes the selected additional layers for the currently selected element
Note
By selecting a sub-construction and opening the context menu, a sub-construction can be deleted separately.