Room/habitation Assignment
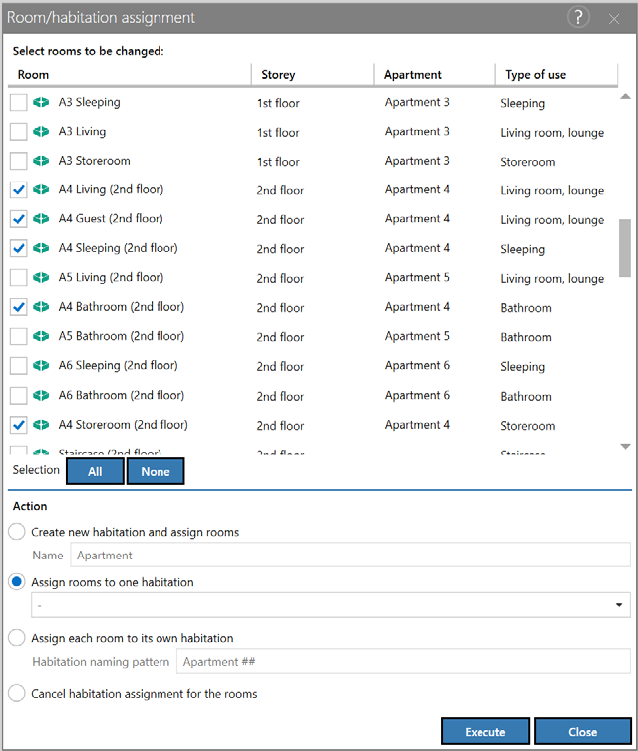
Via Room/habitation assignment, rooms can be assigned to an apartment or the assignment can be completely removed. Calling the dialog is available only in the Project mode. The dialog can be opened via the menu entry Tables | Room/habitation assignment. Alternatively, the dialog can be opened via the context menu if at least one room has been selected.
Table
The table lists all the rooms contained in the project. The checkbox in the first column next to the room name is used to activate or deactivate rooms. The other columns contain information about the storey, the current apartment assignment and the type of use. The name of the rooms as well as the apartments can be changed directly in the table.
Selection
The selection can be used to activate or deactivate the checkboxes of all the rooms contained in the table.
Action
- Create new habitation and assign rooms: The current selection can be assigned to a newly generated apartment.
- Assign rooms to one habitation: The current selection can be assigned via the drop-down list to an already existing apartment.
- Assign each room to its own habitation: The current selection of rooms is assigned to a separate apartment in each case. The sample apartment designation can be customized individually. The ## stands here as a placeholder for a numbering, which is carried out with the creation of the apartments.
- Cancel habitation assignment for the rooms: The apartment assignment is canceled for the current selection.
Execute
The Execute command performs the currently set action for the activated selection. Afterwards, the dialog remains open to allow further actions.
Note
By calling via the context menu, the rooms marked with multi-select are taken over as activated in the table of the dialog "Room/habitation assignment".