Database Import (ODBC & XLSX)
The File|Database menu enables to import tabulated data from different data sources via ODBC (Open Database Connectivity) of WINDOWS. Alternatively, table data can be imported directly from MS Excel folders (file format * .xlsx).
The types of objects and their attributes are listed on the table „Object Type“ on the dialog File|Database|Definition. For point objects (point source, receiver) also the geometry (xyz coordinates) can be imported.
ODBC Import
In order to access to the ODBC database interface suitable ODBC drivers must be installed on your PC. The ODBC drivers on your system are listed in the WINDOWS Control Panel. Otherwise, suitable ODBC drivers must be installed. It is not sufficient having the drivers just stored on your system. In addition, a suitable database table used for import must exist (by assigning the ODBC driver to a type of database). Only in this case, the selected data source appears in the list.
Data for Import
At present, data for the following object types can be imported using the Database dialog:
- data for all CadnaA objects, except for tennis, bridge, level frame, text frame, section, symbol, and station),
- data for library objects in the following libraries:
- sound levels
- sound reduction indices
- absorptions
- diurnal pattern
- directivity
- text block
- road types
Selecting the ODBC data source
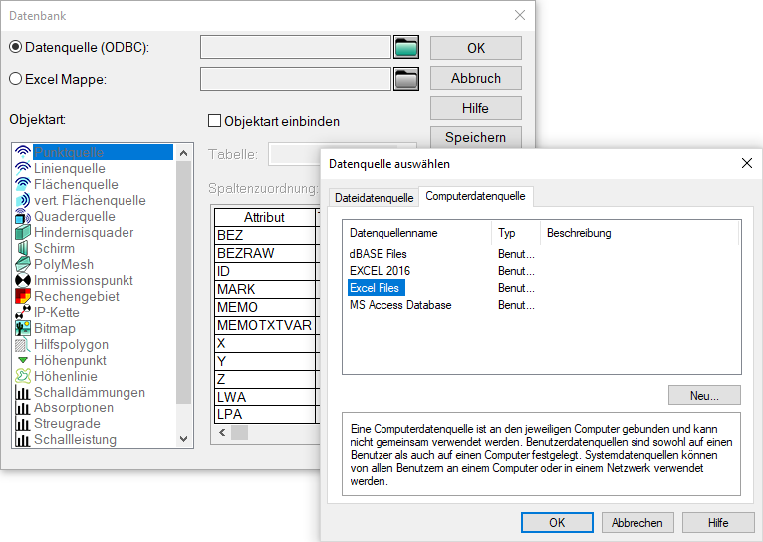
This list can later be accessed in CadnaA. However, you may call this data connection also in CadnaA. In this case, no change to the system level is required. Select the Define command from the File|Database menu.
Note
The data sources shown - here on a German Windows system - depend on the installed ODBC driver versions.
In the Select Data Source dialog, the data source is selected first. Click on the file selector symbol  and select the appropriate type of database and close the dialog with OK.
Selecting the data range
Prior to the import from MS-Excel the data range must be named (e.g. by „Data“). This data range of the table is addressed via the list box „Table“ on the dialog Database.
Selecting object type and table
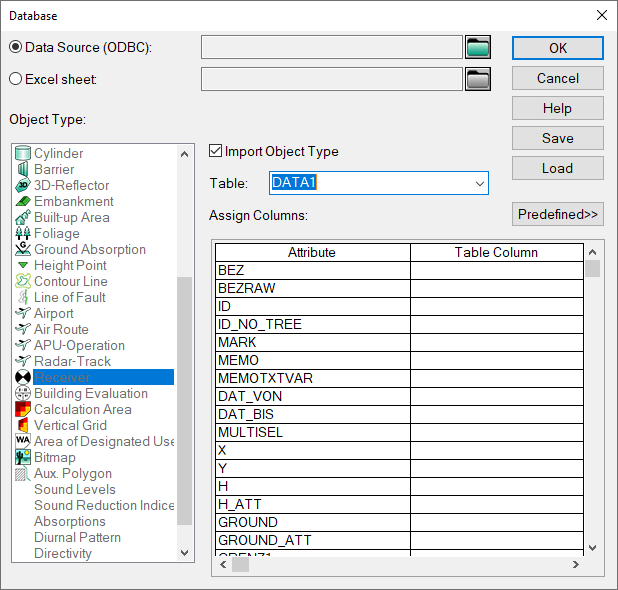
Select first the object type by clicking with the mouse. Then enable the option „Import Object Type“ and select from the list box „Table“ the appropriate data range.
Assigning attributes
The column mapping table defines which CadnaA attribute (left column "Attribute") is to be written with which value from the database (right column "Table Column"). In the case of an Excel file, the database attribute is defined by a column header. By default, the column mapping table is empty. Entries can be added as follows:
- Click "Defaults>>" and select "Default Attributes" to add a list of the most relevant attributes (not all).
- Right-click on the table and select "Insert before/after".
Values for individual rows can be entered either directly in the table or via the dialog that opens when double-clicking a row:
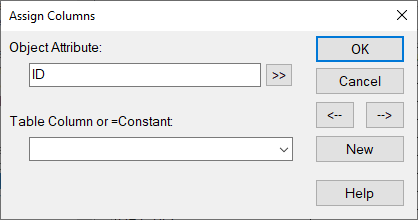
The object‘s ID is used for synchronization between the object parameters and object‘s geometry. Finally, after assigning all attributes, close the dialog Database with OK.
Importing the data
Proceed by selecting the command Import from the File|Database menu.
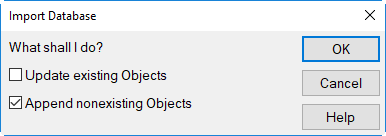
Select on the Import Database dialog one or both options:
- Update existing Objects: Just the existing objects will get updated without appending non-existent objects.
- Append non-existing Objects: The non-existing objects will be appended without updating the existing ones.
With both options checked, the existing objects are updated and non-existing are appended.
Buttons „Save/Load“
These two buttons on the Database dialog offer to save and load the selected options and the list of assigned attributes to an external database configuration file (*.cndb).
Note
The settings made on the Database dialog remain while CadnaA is running, but will be lost when closing the software. This option enables to save the settings anyway.
Requirements and Limitations for ODBC-Import
Please consider that the data import via ODBC is, in principal, a text import and that - depending on the driver used - the following requirements and limitations regarding the file path, the filename, and the text format may apply:
- The accepted length of the file path may differ among different ODBC drivers. In case of import problems copy the file to be imported to a shorter file path (e.g. to C:\...)
- The filename accepted by some ODBC drivers are limited to 8+3 characters (as was enforced by Windows 3.11).
- Column headings must start with text (i.e. with letters). Numbers as leading character in column headings cause import errors.
- In column heading no special characters or blanks are permitted (except for the underscore "_").
- If a column lacks data in the first data lines, the ODBC driver assumes that no data are existing also in the subsequent lines. The import then does not provide the desired data. Fill the void cells in these cases in the import file with permissible values (e.g. zero) and repeat the import procedure.
- When importing mixed levels or level spectra (e.g. sound power levels and interior sound pressure levels, LWTYP=LW or LI) from a single table the radiating area is relevant for the interior level, however, not for the sound power level. In this case, fill the empty cells by entering "zero".
- When importing of interior levels a value of „-1“ i the respective line of the import table causes the area based object’s geometry to be considered. On import of positive numerical values, however, those are interpreted as the radiating area even if the value based on the object’s geometry is different (option „Area (m²)“ with option „TransLoss“ activated with point, line, and area sources).
Examples:
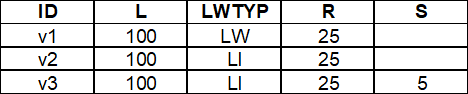
The value „5“ in column S (area) for ID „v3“ will not be imported because the ODBC-driver assumes due the preceding empty cells in this column that no subsequent data follows.
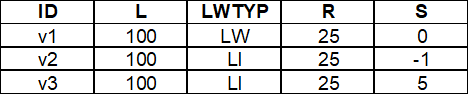
For ID „v1“ the area S is not relevant (value „0“ in column S).For ID „v2“ the areas based on the object’s geometry is used (value „-1“) while for ID „v3“ the area 5 m² is imported and used.
Importing Objects with ID from ObjectTree
When importing objects the ID part of which results from the ObjectTree this part will be ignored when synchronizing data. This default setting can be changed via file CADNAA.INI in section [Main] by OdbcUseObjtreePart=1. In this case (with OdbcUseObjtreePart=1), the ID-part resulting from the ObjectTree will be respected.
Resetting the ODBC-Connection
In case error messages by the Windows-system appear during ODBC-import, this can result from a ODBC-connection not having been reset during a previous import procedure. To reset a failing ODBC-connection hold the CTRL-key pressed while selected the command Database|Definition (File menu). In case attributes have been addressed already, those will be kept when resetting.
Importing string variables
The ODBC import enables to import string variables saved to the Memo-Window dialog of CadnaA objects. To this end, the table from which the data is imported must be prepared - for example, in MS Excel. In each table cell, concatenate the name of the string variables and their value using the equals sign. The value can either be figures or strings. Strings may contain blanks.
After this, the table to be imported - for example - looks as follows:
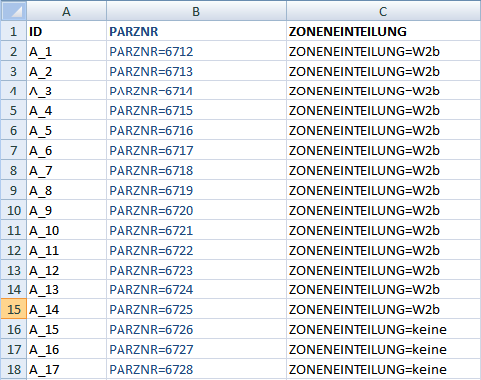
Proceed in CadnaA using these the steps:
- Define the ODBC import filter as described above.
- On the Database dialog, select the ID (as synchronizing item) in the „Assign Columns“ table, and in row „MEMOTXTVAR“ the name of the first column containing text variables.
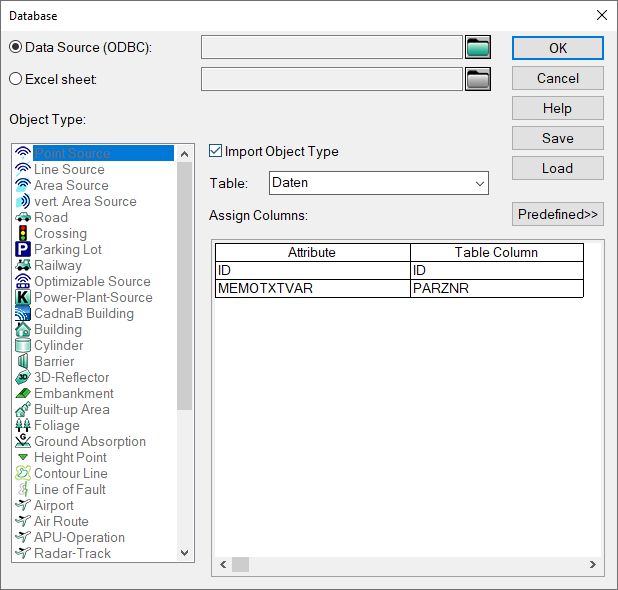
- Close the dialog by OK.
- Import the data via the menu command File|Database|Import.
- Since the objects already exist, select the option „Update existing Objects“ and close the dialog by OK.
In order to import multiple string variables, the above import procedure must be repeated for each table column containing string variables.
XLSX Import
Importing data from an MS Excel file (* .xlsx file format) does not require a database driver. The data can be imported directly. The procedure in the Database dialog is analogous to that for ODBC data sources and is therefore only described here in a nutshell:
- Preprocessing of the Excel file:
- Select the range which contains the data to be imported. The first row of this range includes the column heading.
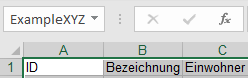
- Define a „Excel name“ for this range. For this, click into the following field while the range is still selected and enter a name. Confirm the input with Enter.
 |
|
- To check if the name was applied successfully, you should be able to select the name from the same field (when opening the drop down menu)
- Open CadnaA and select the „Excel Sheet“ option from the Database dialog.
-
Select the XLSX file containing the import data via the activated file selection icon
. -
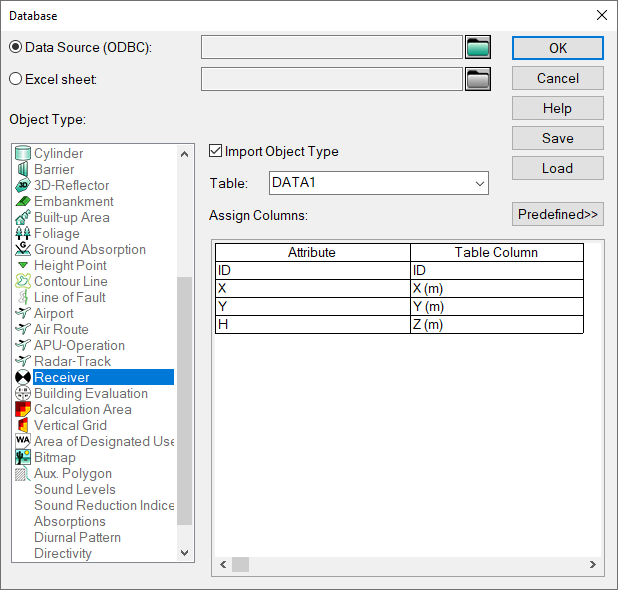
Select the object type to be imported from the “Object Type“ table and activate the option „Import Object Type“.
- The Excel range which was named previously should appear in the „Table“ list box.
- The table „Assign Columns“ is used to define the assignment of object attributes of the selected object type. Double-click in a row of the table column to display and select the appropriate data column from the MS Excel spreadsheet. Alternatively, the column‘s name - if known - can be entered using the keyboard.
- Close the Database dialog with OK.
- Open the dialog File|Database|Import.
- Activate one or both available options and click OK to import the data.
Importing string Variables
The procedure for importing text variables described above for the ODBC interface can also be used for the Excel import. The disadvantage of this approach is that a separate import must be performed for each memo variable.
Alternatively, an Excel column can be imported into the MEMO attribute, which contains all individual text variables. Please note in this case that the line break between the individual text variables must be defined in one of the following ways:
- Line break inside a specific Excel cell with ALT+ENTER
- „var1=123“&CHAR(13)&CHAR(10)&“var2=456“&...
- „var1=123“&CHAR(10)&CHAR(13)&“var2=456“&...
Buttons „Save/Load“
see above
Example
importing the geometry import of receivers
Special considerations when importing spectra
Spectral data (octaves or third-octaves) can be imported for various libraries via ODBC or Excel import. For this purpose, the attributes S, SIN, and SRAW are available and must be combined with the attribute suffixes attribute suffixes @STF or @STI to address a specific frequency. For details on the differences between these attributes, see S.
Notes:
- In most cases, using SRAW reflects the expected behavior and is therefore the preferred option.
- When importing octave spectra via ODBC or Excel, the suffixes STF or STI must also be used. The suffixes SOF or SOI, which are generally used for octave frequencies, are not supported in this context.