Bitmap
The object "Bitmap" from the toolbox enables to place and scale bitmap files serving as a background image in the graphics. Multiple bitmaps may exist in a single file.
As long as no bitmap file has been assigned, the bitmap symbol appears inside the bitmap frame. In case a bitmap file has been assigned and a further bitmap is inserted, this gets assigned the last bitmap as a default bitmap.
Activated bitmap may be displayed in the 3D-View (see 3D-View) as ground texture. This applies to both, black & white drawings, as well as for colored bitmaps.
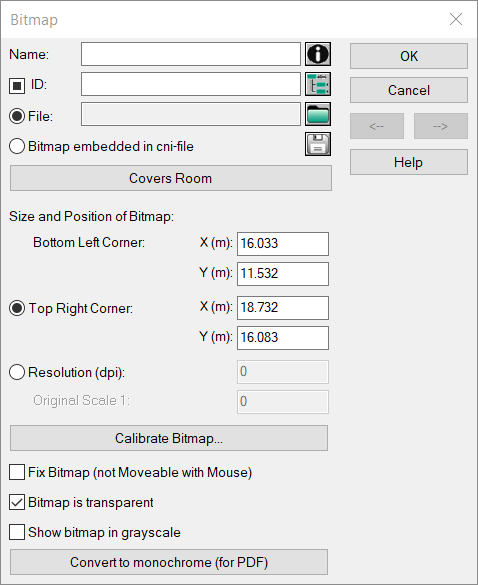
Dialog Bitmap
Dialog options
- Name, ID, ObjectTree, and Memo-Window see Common Input Data
- File: Click the file selector button to select a bitmap file (available file types e.g. *.bmp, *.jpg, *.cmp, *.png, *.tif).
-
option „Save Bitmap in the CadnaR file“: With this option active, the selected bitmap file is saved upon the next save operation within the CadnaR file.The „Save Bitmap File“ symbol
 at the end of the line is only available when a bitmap has been loaded via the „File“ line and has been saved at least once to a
CadnaR
file. After this, the bitmap file embedded in the
CadnaR
file can be saved separately using this button. This feature enables to extract embedded bitmap files and to save them in a separate file.
at the end of the line is only available when a bitmap has been loaded via the „File“ line and has been saved at least once to a
CadnaR
file. After this, the bitmap file embedded in the
CadnaR
file can be saved separately using this button. This feature enables to extract embedded bitmap files and to save them in a separate file. -
Button „Cover Room“: After clicking this button the bitmap's corner coordinates will be adapted to the current room size.
-
Size and Position of Bitmap: The following alternative settings are required:
- the coordinates of the lower left and upper right corners, or
- the coordinates of the lower left corner, the resolution of the bitmap image (in DPI dots per inch) and the scale or
- the coordinates of up to four reference points (see section "Calibrate Bitmap")
-
Button "Calibrate Bitmap": Clicking this button opens the dialog Calibrate Bitmap. On this dialog, the known coordinates of up to 4 reference points can be specified which will subsequently be used to calibrate the bitmap file.
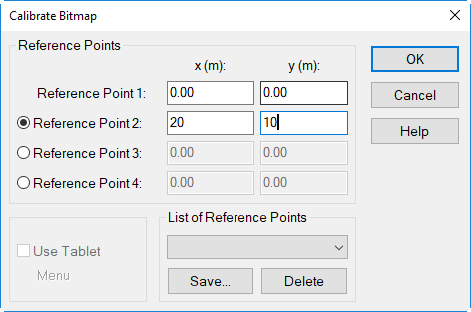
Dialog Calibrate Bitmap
- Reference Points 1..4: Specify by the radio buttons the required number of reference points for which coordinates are available. Enter the coordinates x, y for each reference point. It is recommended to apply a certain input sequence facilitating to remember more easily the order of input (e.g. clockwise).
- List of Reference Points: The entered reference points can be saved (button "Save"), an existing list be selected from the list box or the selected list can be deleted. This option facilitates several consecutive import operations.
On the next dialog, the reference points #1 to #4 are assigned to the respective locations in the bitmap. Use the fiducial mark to click to location of each reference point, one after another following the original sequence of input. Clicking a location in the bitmap will set that point as reference point. Apply the zoom feature if required.
Dialog Symbols:
 |
fiducial mark to set a reference point (mouse arrow head is the hot spot!) |
 |
decrease scale |
 |
increase scale |
 |
close dialog |
- After having assigned all reference points, the dialog Result: Calibrate Bitmap is displayed. Subsequently, you will be prompted to save the calibrated bitmap using a new filename.
Note
Please consider that - when using the option „File“ (see above) - the bitmap file/s are not saved in the CadnaR file itself, but just the reference to these files. If the bitmap file/s are moved within your file structure, these cannot be displayed any longer due to a wrong reference. Bitmap files stored in the same directory as the CadnaR project file (*.cni), however, are always found since CadnaR checks the project file directory level for bitmaps by default.
- Option "Fix bitmap": When this option is enabled, the size and location of the bitmap cannot be changed.
- Option "Bitmap is transparent": With this option activated, the white areas of the black & white bitmaps (with 1-bit color depth) will appear transparent. By default this option is enabled. Please note that color bitmaps (with all higher color depths, such as 8-bit, or 24-bit) are displayed in CadnaR also in transparent mode, but possibly due to limitations of the installed printer driver or printer driver model will not appear in transparent on a print-out.
- Option "Show bitmap in grayscale": Reduction of the color graphics to grayscale. Affects only the display, the original file with the original colors is preserved.
- Button "Convert to monochrome (for PDF)": With this option, a color bitmap with a higher color depth than 1-bit is converted into a monochrome bitmap. After conversion, you will be prompted by CadnaR to enter a file name.