IFC4 STEP (*.ifc)
IFC is the acronym for Industry Foundation Classes, a globally recognized open standard for BIM models (Building Information Modelling). The format is suitable for exchanging building data.
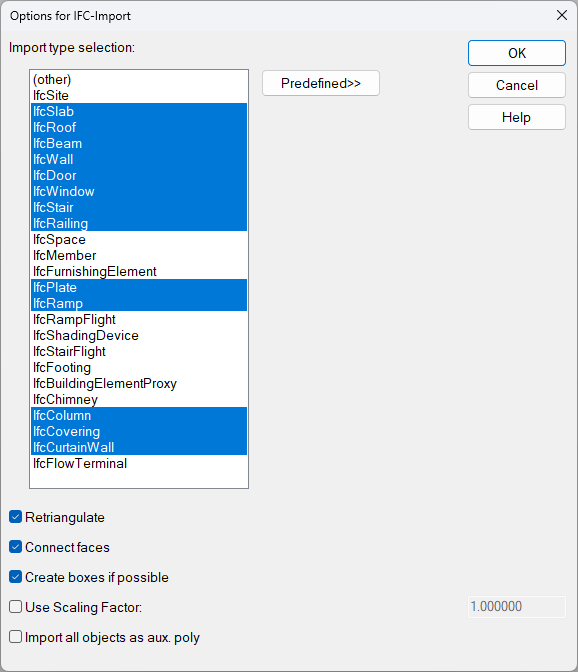
Import type selection & Predefined
IFC files are organized hierarchically. The base class for all physical objects is IfcProduct. Among other things, this class contains the types in the list of the IFC import dialog. Individual types can be selected for the import or predefined and self-defined presets can be selected. IFC files often contain a large number of objects.
The entries in the list are selected by clicking with the mouse while holding the Ctrl key. A self-defined selection can be saved via the "Predefined>>" button and the "Save as" option and will be listed as an option under the predefined selection options in CadnaR in future. Self-defined entries can be removed again with "Delete".
When the "Predefined>>" button is selected, six different presets are also offered for a preselection of types. The presets are structured as follows and contain an increasing number of types:
- Preset XS (Wall, Door, Window)
- Preset S (+ Slab, Roof)
- Preset M (+ Beam, Stair, Railing, Plate, Ramp, Column, Covering, CurtainWall)
- Preset L (+ Site, RampFlight, ShadingDevice, StairFlight, Footing, Chimney)
- Preset XL (+ Member, FurnishingElement, BuidlingElementProxy, FlowTerminal)
- Preset XXL (+ other, Space)
By default, preset M is selected, which contains the following IFC types:
- IfcSlab
- IfcRoof
- IfcBeam
- IfcWall
- IfcDoor
- IfcWindow
- IfcStair
- IfcRailing
- IfcPlate
- IfcRamp
- IfcColumn
- IfcCovering
- IfcCurtainWall
The objects actually imported depend on the type selection and the types contained in the respective IFC file, including the corresponding objects.
The ID of the imported objects is always made up of the type designation and a sequential number. If a component consists of several objects, the CadnaR objects of this component receive the same ID. In addition, the ifc_guid, ifc_name and ifc_type are written to the memo window as memo string variables.
Retriangulate
This option ensures that the geometry data extracted from the IFC model for the objects to be imported consists exclusively of triangles.
Connect faces
If this option is active, contiguous coplanar triangles of an object are reassembled into larger flat surfaces. This enables better generation of CadnaR objects. Holes in surfaces are detected and considered accordingly when generating PolyMeshes or vertical PolyMeshes.
Create boxes if possible
If this option is active, cuboid objects whose geometry consists of 4 vertical and 2 horizontal rectangular surfaces are created as box-type obstacle (if possible).
Use Scalling Factor
A scaling factor can be entered to reduce or enlarge the geometry of the model to scale (default value: 1).
Import all objects as Aux. Polys
When this option is activated, all objects are imported as Aux. Polygons.
Reduce a building model to one room
Ideally, the room to be analyzed is available separately as an IFC file. This file can be imported and then used for the acoustic analysis. However, IFC files often contain entire building models. In a CadnaR project, one room is usually analyzed. The following steps describe how a whole building model can be reduced to a room in CadnaR.
-
Check the imported model and determine the position of the room to be examined. Use the "Section" object to draw a frame around the room
-
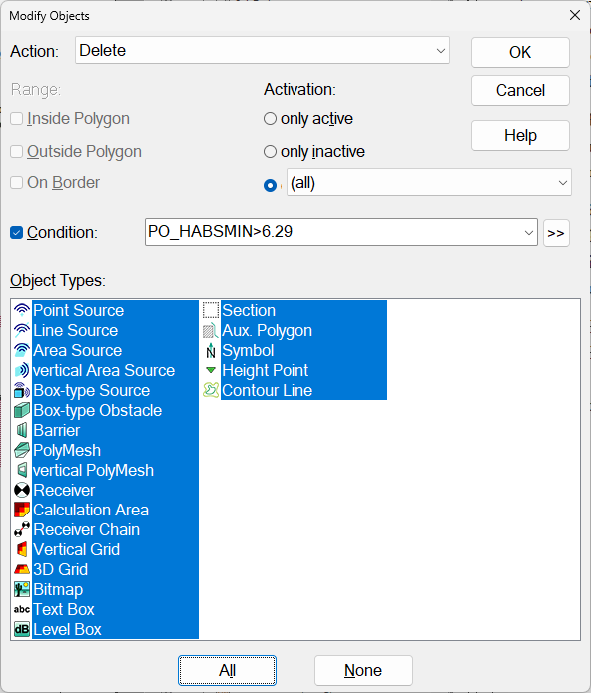
Determine the height of the ceiling and floor and delete all objects outside the relevant floor via Modify Objects. The condition can be set in the Modify Objects dialog, for example with the attributes:
-
PO_HABSMIN (minimum absolute height of the polygon) and
-
PO_HABSMAX (maximum absolute height of the polygon) can be used. With the condition "PO_HABSMIN>6.29" in the screenshot below, for example, all polygons with a minimum absolute height greater than 6.29 m are deleted.
-
-
Manually adjust the geometry of the object types "Box-type Obstacle" and "vertical PolyMesh".
-
Execute the commands "Break Lines" and "Break Areas" via the context menu of the section.
-
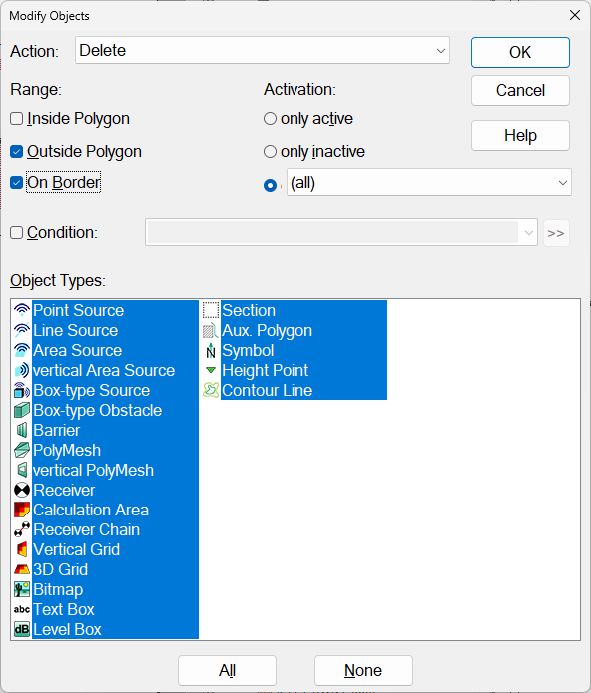
Delete objects outside the section via the context menu of the section and Modify Objects.
-
The remaining objects can then be selected with Multiselect and moved to the coordinate origin.
-
In the final step, the room parameters are adapted to the remaining objects.
Assigning properties to object types
The acoustic properties, such as absorption, scattering and transmission, must be assigned to the imported objects before the calculation. Depending on the size of the project, the properties can be assigned separately for the individual objects or for several objects simultaneously via Modify Objects.
A helpful tool for assigning parameters to a group of objects is the function Modify Objects with the match() expression ( String Expression. For example, in the dialog in the figure below for the "Modify Attributes" action all Boy-type Obstacles whose ID contains the string "Wall" are selected.
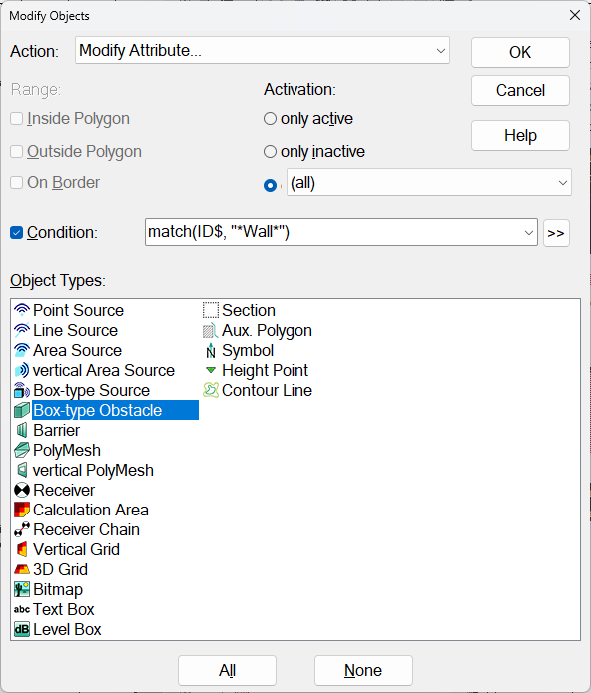
After confirming, an absorption can be assigned to the Box-type Obstacles using the ALFAL attribute.
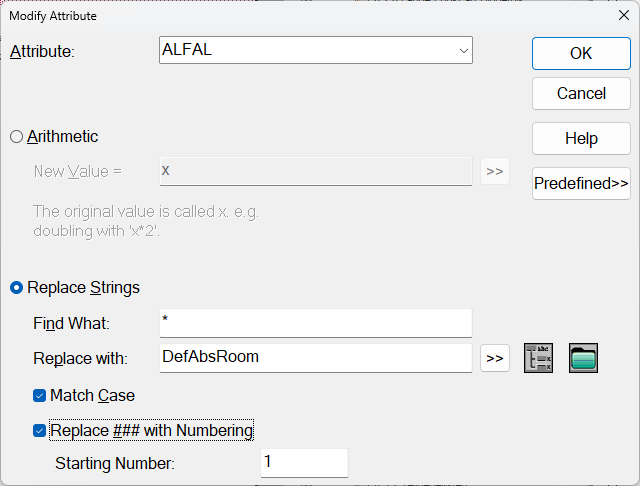
The same procedure can be used for other types by addressing the respective ID in the condition and for other attributes.