3D-View

This button on the symbol bar (or the command 3D-View on the Options menu) displays a 3D representation of the room with all inserted objects. Alternatively, the key combination CTRL+3 may be used to toggle among 3D-view and 2D-room view.
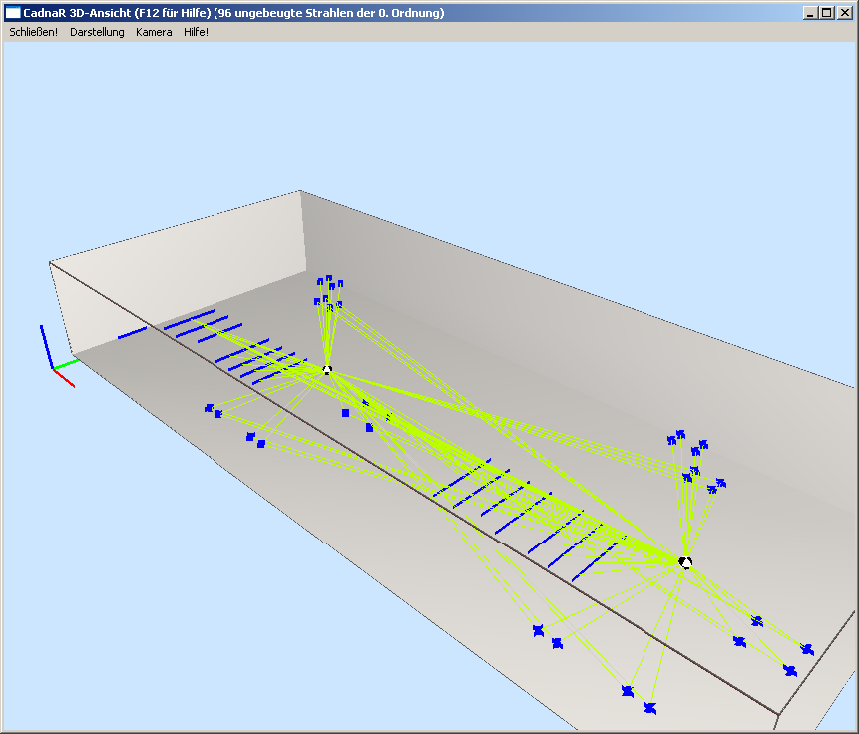
3D-Room View with the undiffracted rays displayed (direct paths)
The 3D view of the room can be rotated, shifted or zoomed using the mouse:
-
for rotating the room: keep left mouse button pressed and move mouse up/down or left/right (or using numerical keys 4, 6, 2, 8, and key 5 for 2D-projection downwards)
-
for shifting the room perpendicular to the viewing direction:
- keep CTRL key and left mouse button pressed and move mouse
- keep middle mouse button pressed and move mouse
-
for zooming the room in/out:
- keep right mouse button pressed and move the mouse (holding down CTRL at the same time increases the movement speed, SHIFT decreases it)
- turn mouse wheel
Mouse Commands
On the 3D view, the following commands using the mouse are available:
- Double-clicking an object in the 3D-view opens the corresponding object dialog.
- Double-clicking an object in the 3D-view while holding down the SHIFT key selects the object in both, the 3D and the 2D view (marked in blue in 3D view). Such a selected object can - for example - be deleted or moved in the 2D view.
Note
keeping the ALT key pressed allows selecting the object even if the option „not selectable in 3D“ is activated (see Common Input Data - Obstacles)
- Selected objects can be moved in the X, Y or Z direction by pressing the CTRL key and the arrow keys (x, y: CTRL + arrow key, z: CTRL + Page up/down: in steps of 1 cm, CTRL + SHIFT + arrow key, Page up/down: in steps of 10 cm)
- CTRL key + double-click with right mouse button inverts the multi-selection status of the object
Menu Commands
Close
closes the 3D-view immediately
Representation|Properties 3D-View menu
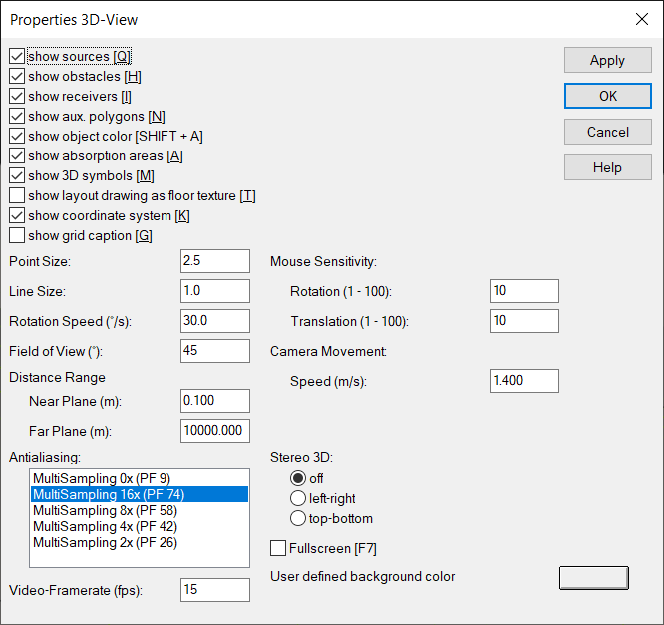
The options associated with the letters Q, H, I, A, M and T are the same as the same commands as on the Appearance menu.
Furthermore the following additional options are available:
| Option | Explanation | Default |
| Point Size | relative measure for the size of points | 5.0 |
| Line Size | relative measure for the size of lines | 1.0 |
| Rotation Speed (°/s) | relevant when rotating the room | 30.0 |
| Field of View (°) | angular range of the viewed area (in the horizontal plane) | 45 degrees |
| Distance Range |
This defines the visible area in the viewing direction (starting at the near plane to the far plane, i.e. the horizon). Depends on graphics card used, other settings may be necessary (condition: both values > 0 m). For example, increase the value of the near plane and decrease the value of the far plane. | near: 0.50 m far: 10000.00 m |
| Antialiasing | This defines the procedure for anti-aliasing in the 3D view. | MultiSampling 16x (PF 56) |
| Video-Framerate (fps) | frame rate used for video output | 15 |
| Mouse Sensitivity | adjustable for rotation and translation (for ego-perspective) | 10/10 |
| Camera Movement (m/s) | speed of caera movement (for ego-perspective) | 1.4 |
| Stereo 3D: |
Note: With an external 3D monitor attached check for its correct 3D stereo image display settings. |
off |
| Fullscreen [F7] | When enabled, the entire screen is used to display the 3D room view ("off" by pressing F7 again) | off |
"Apply" button
applies the current settings immediately, without requiring to close the dialog first.
Representation|OpenGL-Info menu
Displays information about the installed OpenGL graphics card. This information may be useful in case of display errors.
Representation menu
Furthermore, the following features are available via the Representation menu:
| Key | Feature | Options |
| F5 | display Properties dialog | see section at the beginning of this chapter |
| F9 | display OpenGL-Info | see section at the beginning of this chapter |
| F7 | Fullscreen | - |
| F6 | Stereoscopic 3D | Pressing the key toggles the following options in a sequence: |
| Q | show sources on/off | - |
| H | show obstacles on/off | - |
| I | show receivers on/off | - |
| A | show absorption areas on/off | - |
| M | show 3D symbols | - |
| T | show bitmap as floor texture on/off | - |
| D | show directivity of point sources | Pressing the key toggles the following options in a sequence: |
| SHIFT + G | Show ObjectTree Groups | Pressing the key toggles the following options in a sequence: |
| K | show coordinate system on/off | - |
| G | show grid caption | - |
| SHIFT+W | show room | Pressing the key toggles the following options in a sequence: |
| W | show wireframe view on/off | Pressing the key toggles the following options in a sequence: |
| B | select background color | Pressing the key toggles the following options in a sequence: |
| R | change grid representation | Pressing the key toggles the following options in a sequence: With the display options „grid points (height = level)“ and „iso-lines (height = level)“ the range of the grid appearance is used for the ordinate axes (see Grid Appearance). The ordinate axes displayed at the four room corners have with a level range <=50 dB of a scale interval of 5 dB and with a level range >50 dB of a scale interval of 10 dB. Moreover, the level range is shown on the title bar of the 3D view. |
| V | display voxel grid planes on/off | - |
| X, Y, Z | move voxel grid planes into x y z direction | - |
| L | 3D Iso-Faces on/off | Pressing the key toggles the following options in a sequence: To display the 3D Iso-Faces the range of the grid appearance is used (see Grid Appearance). This option is available only provided a voxel grid has been calculated. |
| C | Particle Ping-Pong on/off (requires to activate the option „Particle Visualization“ first, see Particle Visualization) |
The following features are available: |
| J | particle color from frequency band | In this case, the grid colors are per octave, otherwise based on the level. |
| U | show particle trace | - |
| Shift + U | show inactive particles | If set, inactive particles (those calculated using the image source model) are shown as gray dots when using the hybrid model („Image Sources -> Particles“). |
| S | show rays for calculated receivers on/off | - |
| O | change order of shown rays (all, orders 1 to 10, ++) | - |
| P | change type of shown rays | Pressing the key toggles the following options in a sequence: |
and
| F | automatic rotation about the z-axis on/off | - |
| F4 | generates a screenshot and displays the Save as ... dialog | - |
| F11 | anti-alaising on/off | - |
| + | increase grid point site | - |
| - | decrease grid point site | - |
Camera menu
- Load Preset: When presets for camera positions have been stored, they are selectable here. Once a preset is selected, the view is updated immediately.
- Save Preset: Up 4 presets for camera positions can be stored. Select a preset to save the current view to this preset.
- Delete All Presets: does exactly this!
- Reset Current View to Default (0 (zero) button): does also exactly this!
- Ego-Perspective (SHIFT+F9): switches to the alternative control of the camera using the arrow keys + mouse from ego-perspective (camera position and orientation are retained)
- Camera movement along aux. polygon (SHIFT+M): With an auxiliary polygon selected in the 2D-view and then switching to the 3D-view the camera will travel automatically along this auxiliary polygon. The camera can be rotated using the mouse
- Virtual Acoustic Camera (CTRL+F9): With a receiver selected, CTRL +F9 directly opens the virtual acoustic camera for this receiver (if the virtual acoustic camera has been calculated beforehand, see Calculate Virtual Acoustic Camera)
- Settings for Virtual Acoustic Camera (see Calculate Virtual Acoustic Camera)) :
- Mode: absolute or dynamic
- Oversampling: 1 to 10
Video menu
- Init Recording (key [Pos1]): prompts for a file name and path (*.avi). Subsequently, a dialog to select the video compression method is displayed. Select a method and close the dialog with OK.
- Start Recording (key [Pos1]): Selecting this command starts the recording. From now on, all the movements executed in the 3D view are recorded.
- Stop Recording ([End] key): Selecting this command stops the recording.
- Finish Recording ([End] key): Selecting this command writes the video file to the specified directory.
Please note some further information regarding video recording:
- Video capturing works using interactive mode. This means that you may - while the video is being recorded - move freely through the room by using the conventional keyboard or mouse buttons. Thus, there is no predefined camera path used.
- A video capture can be paused/resumed as long as the size of the 3D view remains unchanged.
- Stereoscopic 3D videos may also be captured.
- Full-screen videos may also be captured by using hotkey controls.