Auralize Partial Echograms
Select this command to auralize the partial echograms after calculation. The Partial Echogram Auralization dialog is displayed.
Note
For more information on auralization in CadnaR and in particular on the liability information see Auralization.
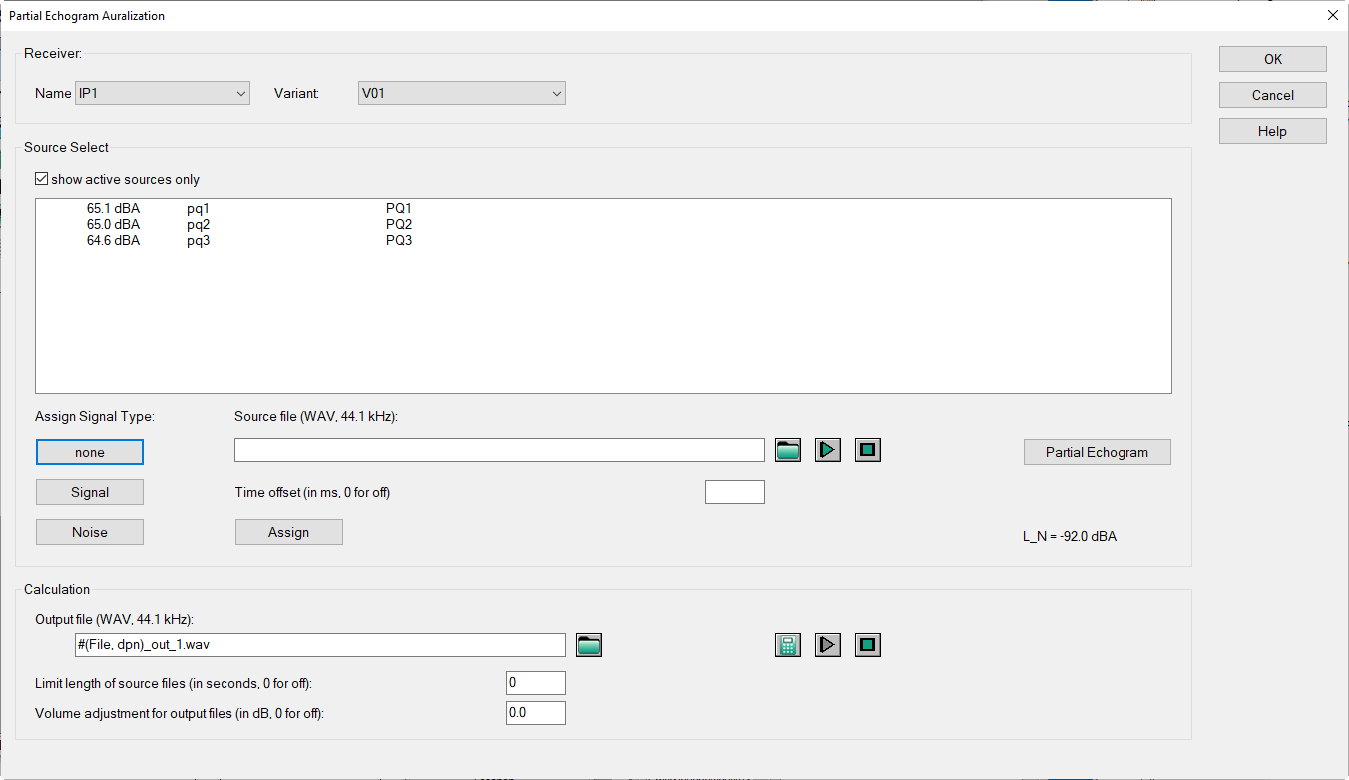
Dialog options
Dialog Section „Receiver“
Select the receiver by name for which auralized signals shall be generated and played. The selected receiver is highlighted in the 2D view (flashing). For multiple variants, the variant can be selected.
Dialog Section „Source Select“
When having a source selected, it will be highlighted in the 2D view. Options:
- Check box "show active sources only" (by default ON): With this option is deactivated, also deactivated point sources will be listed.
- The table contains the point sources available for the selected receiver in the selected variant with ID, name and (in the case of a valid calculation) their respective level contribution (in dBA).
"Partial Echogram" button
With just a single combination receiver-point-source selected (i.e. just a single line in the table), this button can be used to display its partial echogram (for options in the Echogram dialog, see Receiver, Dialog Echogram).
Source file
Use the file selection symbol  to select a WAV file. This file can be assigned either as sou as the signal or as noise file to be used in the auralization. Several WAV files can be assigned as signal or noise signals (see section „Assign Signal Type“).
Clicking the button  plays the source file using the audio device selected in MS-Windows, clicking the button
  stops the playback.
Time offset
A time offset (in ms) can be assigned to each source when assigning signals. Both, negative and positive offsets can be used. A negative offset (e.g. -3000 ms = -3 s) generates silence of the specified length at the beginning of the output signal. With a positive offset (e.g. 2000 ms = 2 s) the output signal jumps forward by this point in the timeline of the selected WAV file.
A positive offset can - for example - be useful for noise sources in order to reassign a source file that has already been assigned for another noise signal.
Assign Signal Type
These buttons are used to assign the signal type to one or more sources in the "Source Select" list:
- none: The source file is not assigned and this source is not auralized. This means that sources that should not be auralized do not have to be deactivated in the project itself; this can be done in the Partial Echograms Auralization dialog.If the signal type „none“ is selected, no auralization occurs even if a source file has been assigned.
- Signal: The currently selected source file is assigned as signal to this source. A successful assignment is indicated in the table row by a preceding "SIG" (for "Signal").At the same time, the STI value calculated for this source-receiver combination is displayed at the bottom right in the "Source Select“ dialog section. As long as just a single signal and no noises are selected, this represents the STI value without noise. If one or more noises are assigned, this represents the STI value with total noise.At the same time, the noise level L_N (in dBA) is displayed provided at least a single source has been assigned for signal type „Noise“.Several useful signals can also be assigned, however, in this case there is no valid STI value.
- Noise: The currently selected source file gets assigned to this source as a noise signal. A successful assignment is indicated in the table row by a preceding "NOI" (for "Noise").At the same time, the STI value including all noises and calculated for this source-receiver combination is displayed at the bottom right in the "Source Select" dialog section. Furthermore, the total noise level L_N (in dBA) is displayed (i.e. the higher the noise level, the lower the STI value).
"Assign" button
This button is used to assign the selected source file, including the currently entered time offset, to the selected source or sources in the list „Source Select“. Only these sources are auralized afterwards.
After the assignment, the assigned source file(s) - including any offset entered - is/are displayed in the „Source Select“ table:

Two source files assigned: one signal file and two noise files
Note
The status, the assignment of a source file and, if applicable, the offset are also saved in the Memo-Window (see Point Source) of each point source.
Restore source file
In case the "Source file" selection line is empty or has been deleted, an assigned source file can be restored by double-clicking in a line on the list „Source Select“. The name and the file path of the source file are then reentered into the input box.
Dialog Section "Calculation"
The following options are available:
-
output file: The file name of the output file is displayed in this box (default: #(File, dpn)_out_1.wav). Use the file selector symbol
to select a WAV file as the source file or enter a file name. -
button
 : Clicking this button causes all assigned signal and noise sources to get auralized separately and getting merged afterwards into a single output file.
 -
button
: plays the output file via the audio device selected in MS-Windows. -
button
: stops playback -
option "Limit length of source files (in seconds, 0 for off)": The playback time of long source signals can be limited.
- option "Volume adjustment for output files (in dB, 0 for off)": The playback volume can be reduced or increased.
Procedural Steps
The most important steps for auralizing partial echograms are listed below:
-
select receiver and variant
-
select a signal type (none/noise/signal) for each source
-
select the source file/s
and, if necessary, enter an offset for each source -
assign the source file/s and, if necessary, the offset to the relevant sources
-
name or select the output file
-
start the calculation
-
play output file
-
adapt signal duration and volume gain if necessary