Inserting Objects
Objects are all graphical elements available on the toolbox of CadnaR which are displayed on the main window. Objects can be entered using the mouse, the keyboard or via an object table. For each entered object a corresponding line in the respective object table on the Tables menu is generated (see Tables menu).
Using the mouse
Depending on the type of object selected from the toolbox different procedures apply to insert a new object using the mouse.
point objects
A point object (point source, receiver point, level box) is inserted by clicking with the left mouse button to the desired position in the main window. With every click a new object of the selected kind is entered and a data set generated in the corresponding object table.
line-like objects
A line-like object consisting of multiple polygon points (e.g. line source) is entered by clicking successively with the left mouse button to insert all points of the polygon. The input is finalized by clicking the right mouse button.
area-like objects
With area-like objects these cases have to be distinguished:
- polygonal area-like objects (e.g. Area Source, PolyMesh): The object is entered by clicking with the left mouse button at all polygon points. Clicking the right mouse button cancels the input and closes the polygon (from first to last point).
- Text Box, Section: Set the mouse cursor to the first corner of the object and draw an area up to the opposite corner of the object with left mouse button pressed.
- Box-type Source, Box-type Obstacle: With these objects two cases have to be distinguished:
- Input of axis-parallel objects: A polygon from two points (by clicking with left mouse button) is interpreted as the diagonal of an axis-parallel box-type object. Now, click the right mouse button the finalize the input procedure.
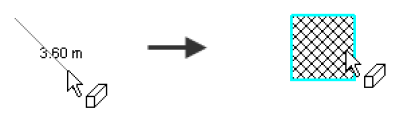
Input of an axis-parallel box-type obstacle
- Input of rotated objects: Input of a polygon from three points. The first segment is interpreted as the first edge of the object. The perpendicular distance of the second segment to the first one is interpreted as the second edge length of the object.
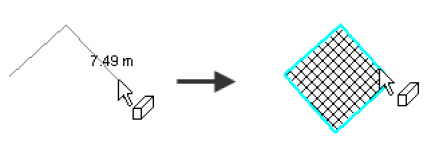
Input of a rotated box-type obstacle
Note
In order to finalize the geometry of the object enter its height on the edit dialog or in the respective table column.
Object snap during input
By holding the ALT key while inserting a new polygon point, an object snap to the nearest polygon point of another, active object is performed.
Default object instead of last object
By holding the ALT key pressed while finalizing the object input, the object properties from the default object are used, instead of the properties of the last object in the respective object table (i.e. with “empty” Name, ID, etc.).
using the keyboard
After selection of an object type from the toolbox the object's coordinates are entered via the keyboard. When typing in the first figure, the dialog Input of Point opens. By default, orthogonal coordinates are used (xy pairs of coordinates).
Mouse and keyboard can be used alternatively. Also, the setting for orthogonal/polar or absolute/relative coordinates can be changed when entering several points as required.
Dialog Input of Point
By default (i.e. with both options "Relative" and "Polar" are deactivated), the entered coordinates are interpreted as absolute coordinates referring to the origin at (x, y) = (0, 0) m.
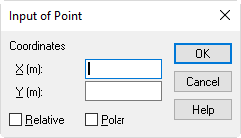
- Option "Relative": With this option activated, the entered coordinates are interpreted as relative coordinates referring to the last entered point.
- Option "Polar": With this option activated, the input of a point uses polar coordinates, consisting of an angle (°) and a distance (m) from the origin. When the option "Relative" is activated as well, the polar coordinates refer to the last entered point.
via an object tables
Furthermore, new objects can be generated via the object tables. Insert a new line using the table's context menu and double-click into the new row for editing. When closing the table the new object is displayed in the graphics.