Appearance
Via this dialog the graphic representation of the CadnaR specific object types can be edited regarding the line width, the color and - depending on the type of object - the type of hatching and the symbol size. The settings apply globally to all objects of the respective object type in a project. Just the object "Auxiliary Polygon" can be defined individually via its edit dialog regarding its appearance. The subsequent settings refer to the selected object type.
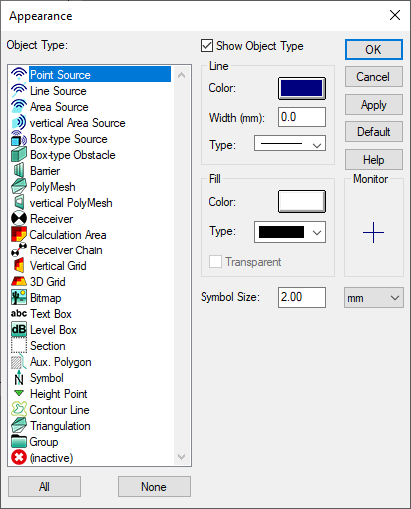
Dialog Appearance
Dialog options
Show Object Type
This option enables to suppress globally an object type from being displayed on screen at all. This setting is saved when quitting CadnaR. Thus, upon a restart not all objects may be displayed.
Note
Double-clicking on an entry in the object list also activates or deactivates the display of this object
If the checkbox is set for "Show object type", the associated object can be selected (see Selecting Objects). Accordingly, deactivated objects can also be part of the (multi-)selection, provided that they are also displayed.
Buttons "All" and "None"
Buttons for quickly adjusting the object display of all objects. "All" activates the display of all objects, "None" deactivates the display of all objects.
Button "Apply"
When clicking this button the modifications are applied to the CadnaR main window immediately. Clicking the button "Cancel" results in the dialog being closed and the modifications being ignored. Clicking OK closes the dialog, but applying the modifications.
Button "Default"
Resets to the default settings for the object appearance.
Edit Ranges „Line“ & „Fill“
Depending on the object type either just the range "Line" (e.g. with point and line objects) or both ranges are available (e.g. with area objects).
Color Line & Fill
Via the button „Color“ a color can be selected directly (option „Direct Input of Color“). Alternatively, the color can be defined using a formula (option „Use Formula for Color“).
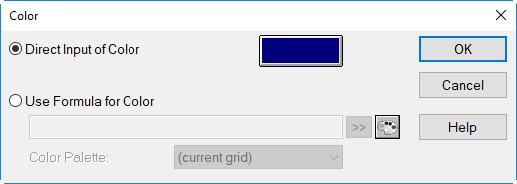
Direct Input of Color
After clicking the colored button select the desired color from the WINDOWS palette by clicking on it and confirm with OK. In this case the coloring of this object does not depend on a condition.
Define Color
With the button „Define Color“ on dialog Color a new color can be defined and be added to the color palette.
Use Formula for Color
By the option „Use Formula for Color“ an object can be colored depending on an object attribute (a numerical value). The attributes (see Object Attributes) can either be entered directly or be selected from the popup menu when clicking the double arrow symbol (>>).
Examples for Formulas:
| Formula | Effect |
| LWA | colorizes sources depending on their A-weighted sound power level (with option "current grid" or by selecting a color palette) |
| iif(LPA>0, rgb(255,0,0), rgb(0,0,0)) | colorizes sources having a LpA greater than zero in red, otherwise black (with option "direct, w/o palette") |
Formulas can make use of the common operators (see Arithmetics).
Color Palette
- Option „current grid“: With this setting the presently selected color palette is used (see dialog Grid|Appearance, see Grid Appearance).
-
Option „direct, w/o palette“
 : In this case the color to be used is specified directly, without a color palette. In order to facilitate the selection, click the color palette button displaying the available WINDOWS system colors. When having selected a color by OK the respective RGB value is written into the input box of the formula. This feature is useful when distinct objects of a specific object type shall be highlighted.
 -
local Color Palettes: Furthermore, on the list box „Color Palette“ all color palettes from the local library (see Color Palettes (local/global)) are listed.
- Selecting a Color Palette
 : Via the file selector symbol color palettes from the local or global library can be selected. Clicking the symbol selects from the global library of color palettes, SHIFT-click selects from the local library.
Fill - Transparent
The option "Transparent" specifies globally whether the respective object type shall be transparent (option activated) or opaque with respect to the background (option deactivated). This may be used - for example - in conjunction with a bitmap in a project. In this case, the setting "Transparent" set for an object type on top of the bitmap will keep the bitmap visible.
Symbol Size
This setting is used for the size of an object symbol and is only available for point objects. Specifying the unit enables to apply absolute and relative sizes:
- selection meter (m): With this setting the symbol's size is adjusted according to the selected scale.
- selection millimeter (mm): With this setting the symbol's size is independent of the scale.
Deactivated Objects
The dialog Appearance enables as well to specify the appearance of deactivated objects (object type "(deactivated)" at the bottom of the object list). Deactivated objects which are invisible in the graphic can be not selected and therefore not be edited. When deactivated objects are, however, displayed (e.g. by hatched lines) they can be selected and edited.
Apply 3D object color
For various objects (e.g. box-type obstacle, barrier, PolyMesh, vertical PolyMesh), the 3D object color can be specified individually using the "3D" button in the respective object dialog. This color can be transferred to the 2D view.
To achieve this, proceed as follows:
- Open the Appearance dialog on the Properties menu.
- Select the type of object for which the individually defined 3D object color are to be adopted in the 2D view.
- Click on the “Color” button (for “Line” and/or “Fill”) and activate the “Use Formula for Color” option.
- Enter the following expression:
iif (OGL_USECOL $ == "x", OGL_OBJCOL, rgb (255,0,0))This expression causes - provided the "Object color" option on the Options for 3D Representation dialog is selected - to adopt the object color selected also in the 2D view. If the option is not selected, red color is used (rgb(255,0,0)).
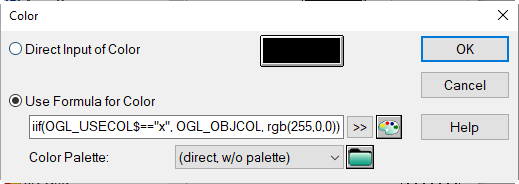
- For “Color palette” select the option “direct, w/o palette” and close the dialog with OK.